Configuring Azure Entra ID
A guide on configuring a new application: Quickstart: Register an app in the Microsoft identity platform - Microsoft Entra | Microsoft Learn
-
Redirect URI = https://auth.finlegal.io/login/callback
-
From the Configure platform settings please select Web
-
From the Add credentials follow instructions Add a client secret
-
Please send us the Client\Application ID & the new client secret value (not Secret ID)
-
Please can you also send across the following two endpoints:
- In
App registrations, select your application - Under
Overview, selectEndpoints, and look for the following endpoints: - OAuth 2.0 authorization endpoint (v2)
- OpenID Connect metadata document
- In
-
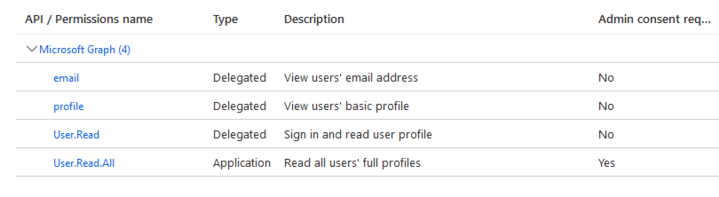
You will need to ensure the following permissions are present or create them if they are not
- In
App registrations, select your application - Under
API permissions, selectAdd a permission - Select
Microsoft Graph, and then selectDelegated permissions - Now use the search to add the following permissions
- In
- You may need to configure the admin consent
- In
App registrations, select your application - Under
API permissions, selectGrant admin consent for X(where X is the name of your Azure AD\Entra instance) - In the list of permissions the final column should update to say “Granted for X” (where X is the name of your Azure AD\Entra instance)
- In
This is url you will need to initiate the authentication flow: https://uk.casefunnel.io/oidc/signin/XX once everything is configured. Your implementation manager will confirm the actuals for XX.