The Excel Workbook feature allows dashboard users to generate Excel Workbooks that include claims' claim data. Users may define the specific items of claims data they wish to see in the Excel Workbook and generate Excel Workbooks individually on a claim or in bulk.
Dependencies
- There are two functional permissions associated with this feature - (1)'Document Template Management' permission is needed by the user (via a role) in order create and edit Excel Workbook Templates and (2) 'Document Generation' permission is needed to generated Excel Workbooks within Claims Automation
- there must be a live Claims Data Schema associated with the case you wish to use Excel Workbooks feature on.
- you will need to reference the Claims Data Schema for the schema property names. If you do not know what these are, please speak with you Customer Success representative and they will be able to provide you with the schema.
Creating and Editing Excel Workbook Templates
The process for creating an Excel Workbook relies on a template being created for a given case that is then made available for users within the Claims Automation dashboard.
Excel Workbook Templates panel on the Settings page
Assuming you have a role with the correct permissions assigned (Document Template Management), navigate to the 'Settings' page within the case you wish to deploy the Excel Workbook Template on. Here you will find the 'Excel Workbook Templates' panel as illustrated in the image below.
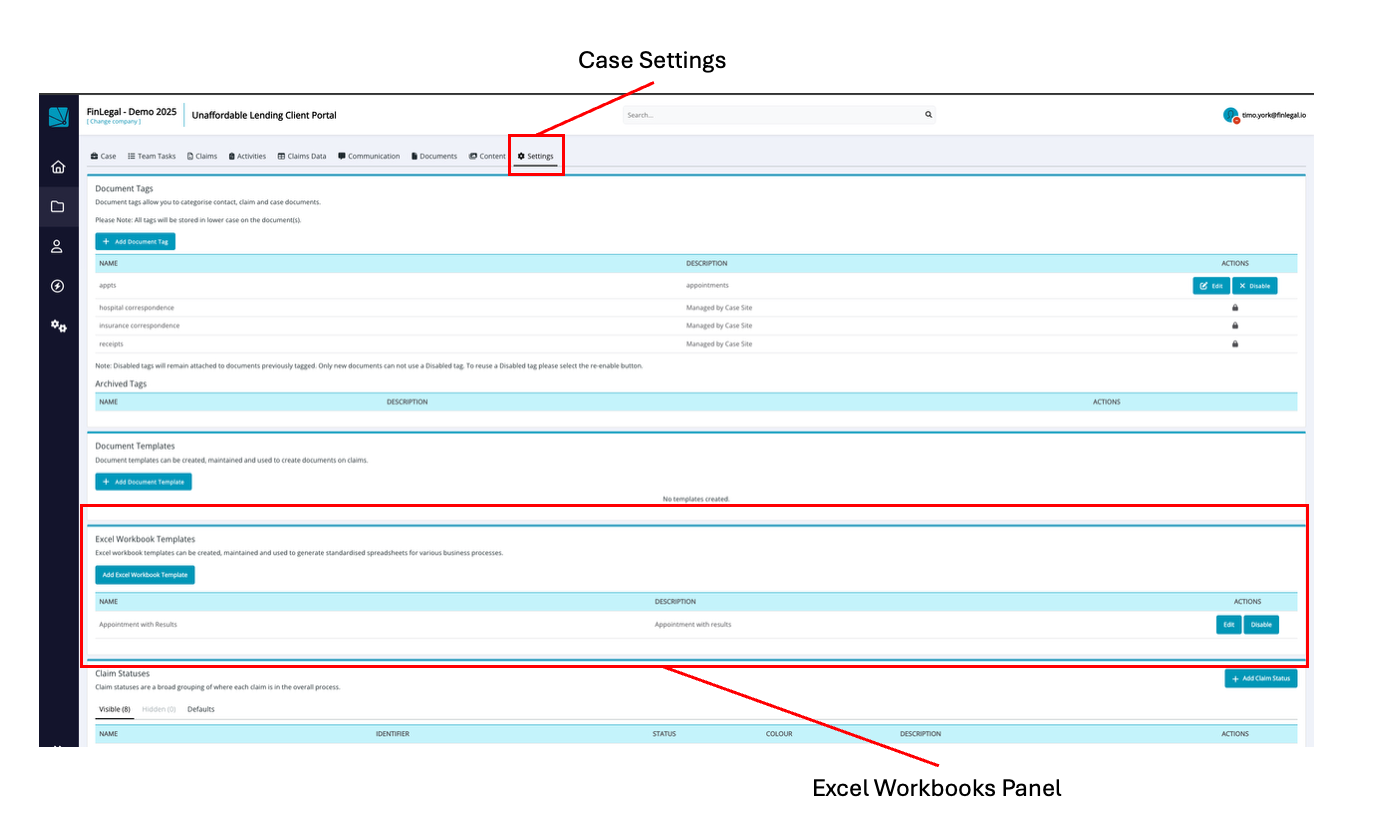
In this panel, you can:
- create a new Excel Workbook Template
- edit existing Excel Workbook Templates
- disable or enable Excel Workbook Templates (make the accessible for use by other users inthe dashboard to generate documents)
NOTE: You cannot currently delete Excel Workbook Templates.
Create a new Excel Workbook Template
To create a new Excel Workbook Template, click the 'Add Excel Workbook Template' button within the 'Excel Workbook Templates' panel. Doing so will open the template editor as can seen in the image below.
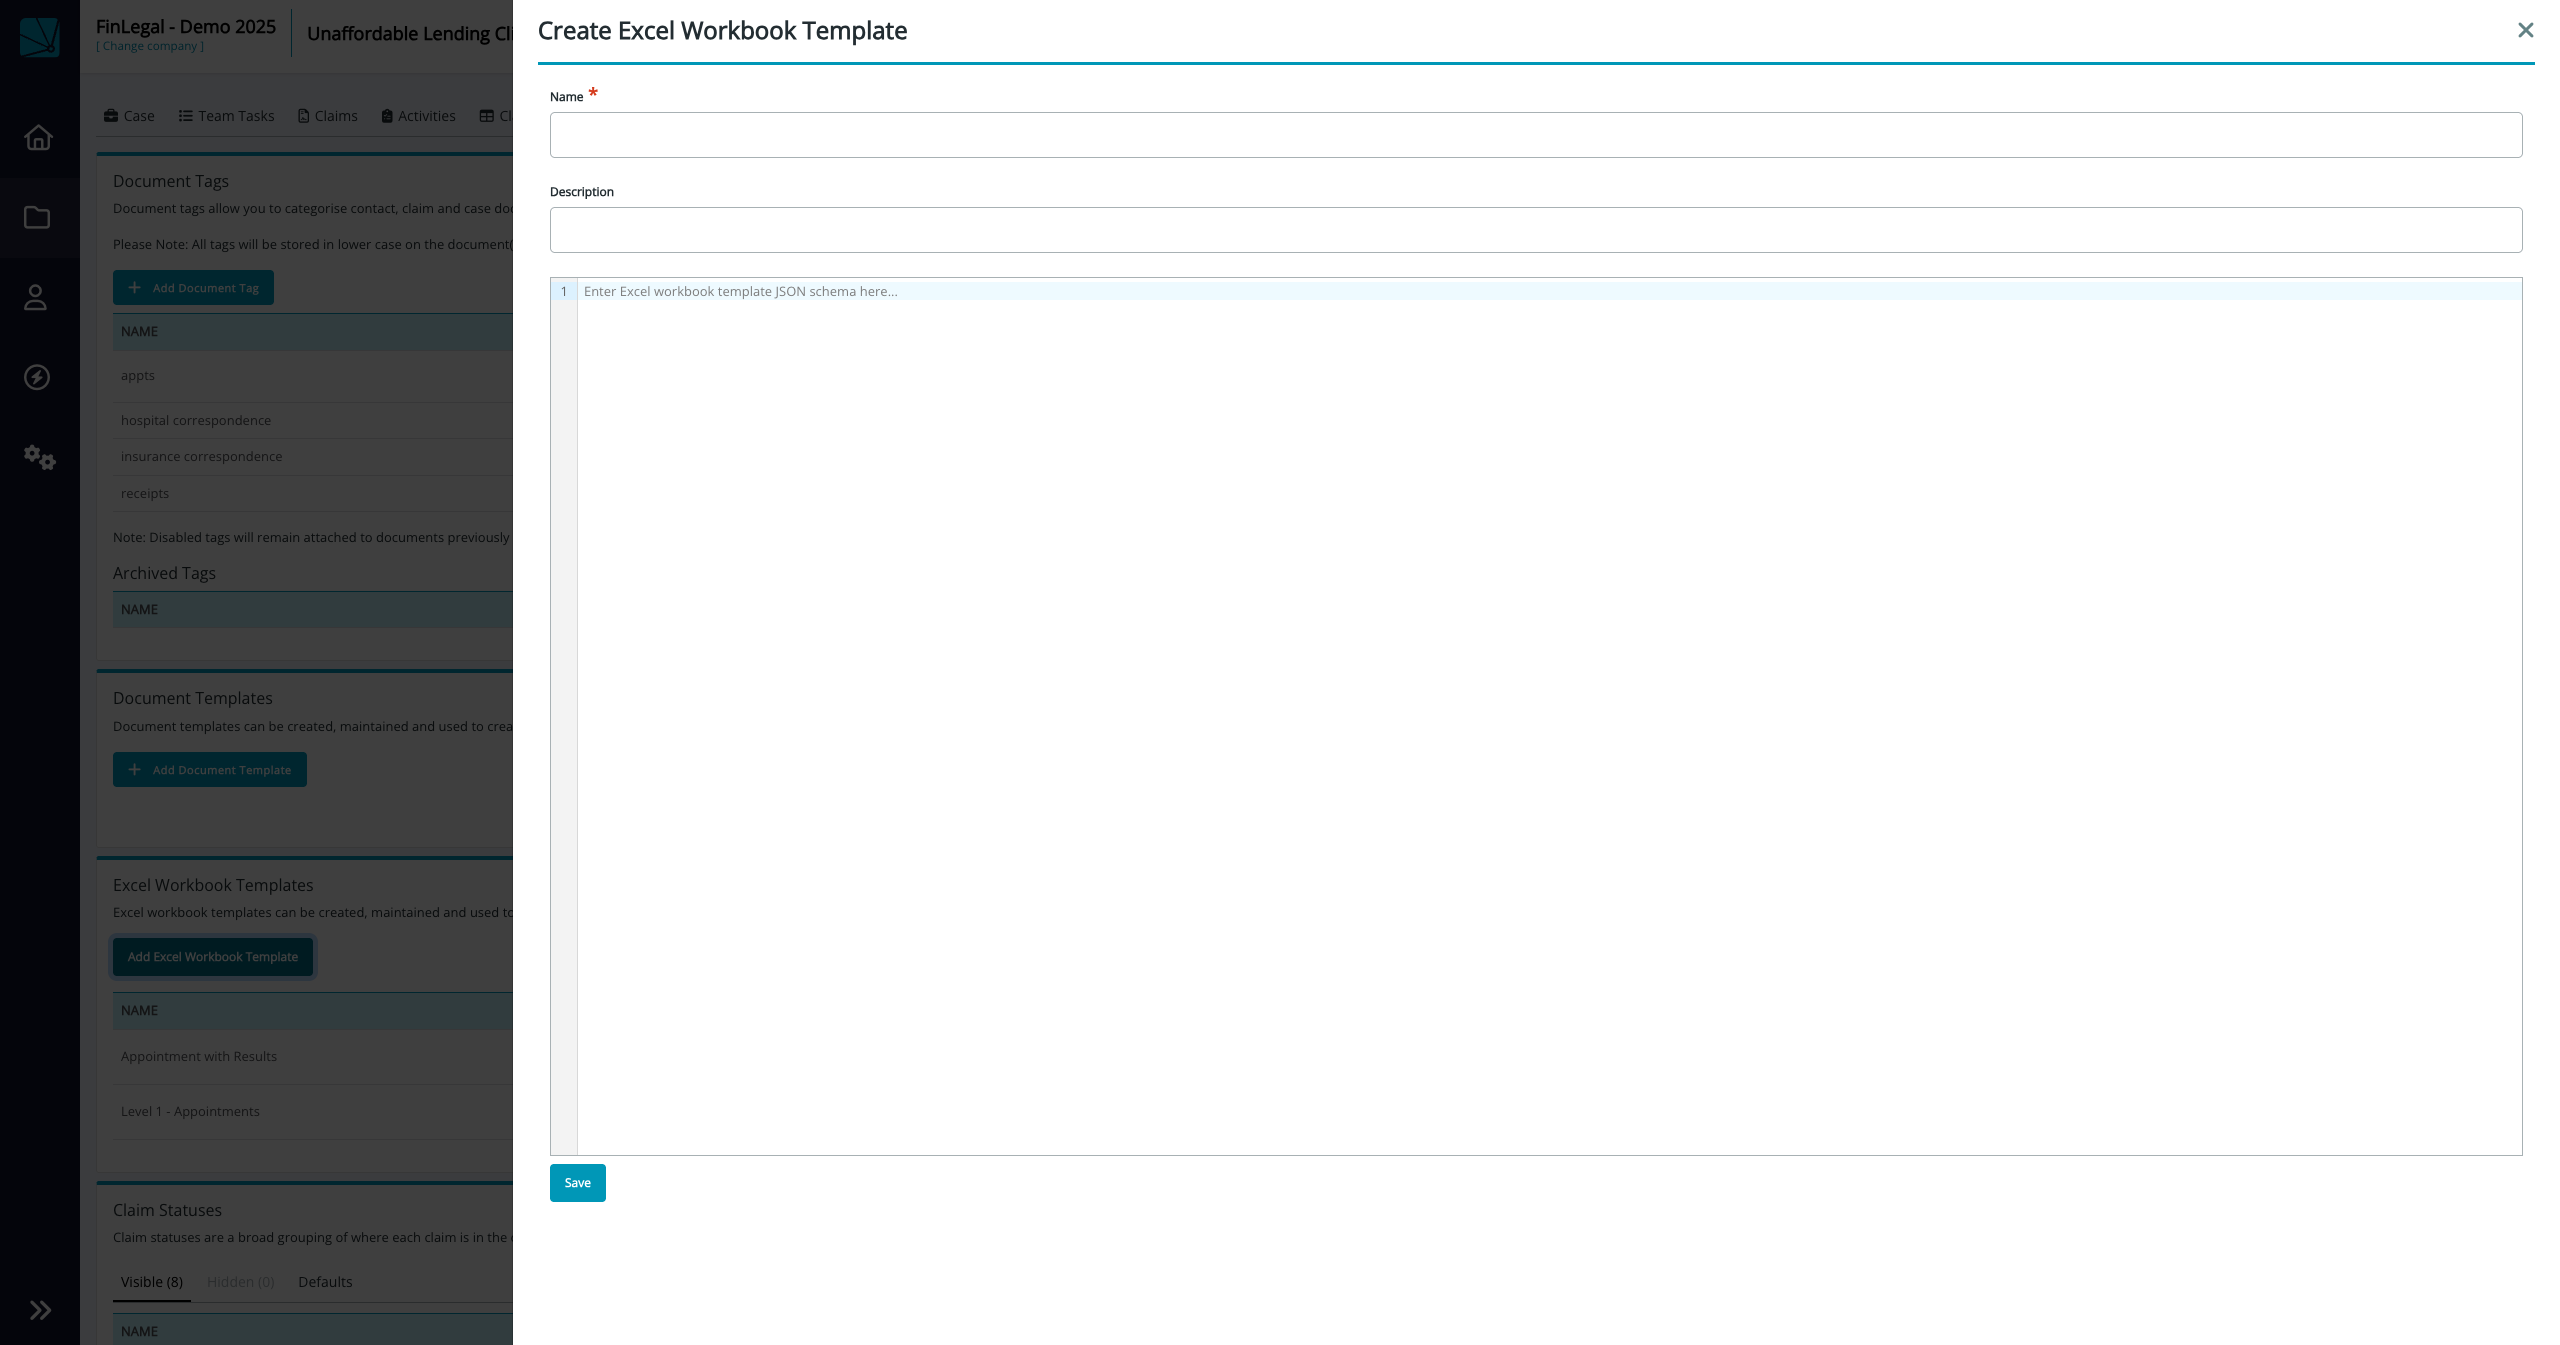
In this form, you can:
- give your template a name - this name is used to refer to your template elsewhere in the Claims Automation dashboard.
- give your template a decription - used to allow you distingiuish betweeen different templates within Claims Automation.
- add your template schema
Once you have included all these elements, you may save the template for use. Upon saving, the template schema will be vaidated and you will be informed if it is incorrect.
Editing a Workbook Template
You may edit a Workbook Excel template. To do this, locate the template you wish to edit with the Excel Workbook Template panel on the settings name and click on the template name. This will open a page allowing you to edit the template name, desciption and schema.
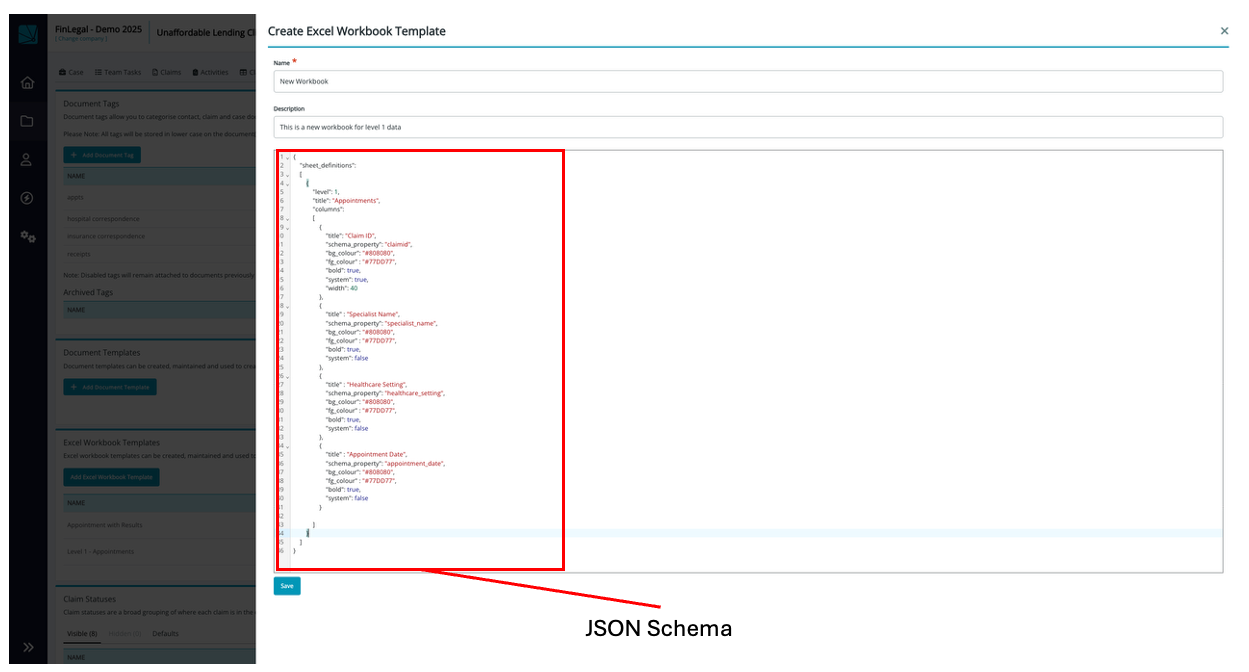
The Template Schema
At the center of the Excel Workbook Template is a template schema. This schema defines the structure for creating an Excel workbook with multiple worksheets, including column definitions, formatting specifications, and hierarchical data relationships. You will use a JSON schema to define this and include it in the template as shown in the image below.
Root Structure
The schema contains a single root property that holds all sheet definitions:
{
    "sheet_definitions": []
}
The sheet_definitions array contains one or more sheet definition objects that describe each worksheet in the workbook. A workbook can have one or more worksheets.
Sheet Definition Object
Each sheet definition represents a single worksheet and contains the following properties:
Basic Properties
{
    "level": 1,
    "title": "Appointments",
    "include_filter" : {
        "schema_property" : "property_name",
        "property_value" : "property_value"
    }
    "columns": []
}
| Property | Type | Description |
|---|---|---|
level | integer | Defines the hierarchical level of claims data (1 or 2) to include in the worksheet |
title | string | The name that will appear on the worksheet tab |
include_filter | object | A filter object where 'schema_property' names the claims data field to filter and 'property_value' defines the required matching value. |
columns | array | Array of column definition objects |
Level Property Usage
The level property indicates which level in the claims data data hierarchy the data in the worksheet pertains to:
- Level 1: Level 1 claims datas (e.g., "Appointments" or "Holdings")
- Level 2: Level 2 claims data (e.g. "Results" or "Trades")
Where level 1 is specified, only level 2 claims data properties can be included in the worksheet. If level 2 is specified, both level 1 and level 2 claims data may be included in the worksheet.
Example with two levels:
{
    "sheet_definitions": [
        {
            "level": 1,
            "title": "Appointments",
            "columns": [...]
        },
        {
            "level": 2,
            "title": "Results",
            "columns": [...]
        }
    ]
}
Column Definition Object
Each column definition specifies the structure and formatting for a single column in the worksheet.
Complete Column Example
{
    "title": "Claim ID",
    "schema_property": "claimid",
    "bg_colour": "#808080",
    "fg_colour": "#77DD77",
    "date_format" : "dd/mm/yyyy",
    "number_precision" : 2,
    "bold": true,
    "system": true,
    "width": 40
}
Column Properties
| Property | Type | Required | Description |
|---|---|---|---|
title | string | Yes | The header text displayed in the column |
schema_property | string | Yes | The data field name from the claims data schema that maps to this column |
bg_colour | string | No | Background color in hex format (e.g., "#808080") |
fg_colour | string | No | Foreground/text color in hex format (e.g., "#77DD77") |
bold | boolean | No | Whether the header text should be bold |
date_format | string | No | String mask for the date format |
number_precision | integer | Specified the number of decimal places for number output | |
system | boolean | no | Indicates if this is system field rather than a claims data property |
width | integer | No | Optional column width in characters |
Formatting Specifications
Color Formatting
Colors are specified using hexadecimal color codes:
{
    "bg_colour": "#808080",  // Gray background
    "fg_colour": "#77DD77"   // Pastel green text
}
Text Formatting
{
    "bold": true,  // Makes header text bold
    "date_format" : "dd/mm/yyyy"   // Formats the a date to the mask provided
}
Number precision
{
    "number_precision" : 2  //number presented to two decimal places
}
Column Width
{
    "width": 40  // Sets column width to 40 characters
}
If the width property is omitted, the column will default to the width of the column title.
Special Properties
System Flag
The system property identifies columns that contain system-generated or identifier data:
{
    "title": "Claim ID",
    "schema_property": "claimid",
    "system": true  // This is a system identifier
}
{
    "title": "Specialist Name",
    "schema_property": "specialist_name",
    "system": false  // This is a claims data property
}
Complete Examples
Single Level Workbook
{
    "sheet_definitions": [
        {
            "level": 1,
            "title": "Appointments",
            "columns": [
                {
                    "title": "Claim ID",
                    "schema_property": "claimid",
                    "bg_colour": "#808080",
                    "fg_colour": "#77DD77",
                    "bold": true,
                    "system": true,
                    "width": 40
                },
                {
                    "title": "Specialist Name",
                    "schema_property": "specialist_name",
                    "bg_colour": "#808080",
                    "fg_colour": "#77DD77",
                    "bold": true,
                    "system": false
                }
            ]
        }
    ]
}
This creates a workbook with one worksheet tab labeled "Appointments" containing two columns.
Two Level Workbook
{
    "sheet_definitions": [
        {
            "level": 1,
            "title": "Appointments",
            "columns": [
                {
                    "title": "Claim ID",
                    "schema_property": "claimid",
                    "bg_colour": "#808080",
                    "fg_colour": "#77DD77",
                    "bold": true,
                    "system": true,
                    "width": 40
                }
            ]
        },
        {
            "level": 2,
            "title": "Results",
            "columns": [
                {
                    "title": "Result Reference",
                    "schema_property": "result_reference",
                    "bg_colour": "#808080",
                    "fg_colour": "#77DD77",
                    "bold": true,
                    "system": false
                }
            ]
        }
    ]
}
This creates a workbook with two worksheet tabs: "Appointments" (level 1) and "Results" (level 2), establishing a parent-child relationship between the data.
Tab Title Configuration
The worksheet tab titles are determined by the title property in each sheet definition:
{
    "level": 1,
    "title": "Appointments"  // Tab will be labeled "Appointments"
}
{
    "level": 2,
    "title": "Results"  // Tab will be labeled "Results"
}
Creating Excel Workbooks from Templates
Once Excel Workbook Templates have been defined on a case, there may be used in two different places:
- through the 'Generate Document' feature on a claim page
- through the 'Genarate Document' features in Claim Automations menu on the claims page
Generating an indiviual Excel Workbook on a claim
To generate an individual Excel Workbook on a claim:
- Got the the claim page for the claim you wish to generate the Excel Workbook for
- In the 'Documents' panel, click the 'Generate Document' button to open the page as shown in the image below

- Select the desired Excel Workbook Template from the list and complete the remainder of the form.
- Click 'Generate Document'
- Your document will be generated as a background job and appear on the claim when complete. If you wish to check on the progress of your document generation, you may view this in the Automations Overview page.
Generating Excel Workbooks in bulk (on many claims)
To generate Excel Workbooks in bulk:
- Go to the claims page and filter and select the claims you wish to generate Excel Workbooks on.
- In the Claims Automation menu, select 'Generate Document', revealing the modal as per the image below.
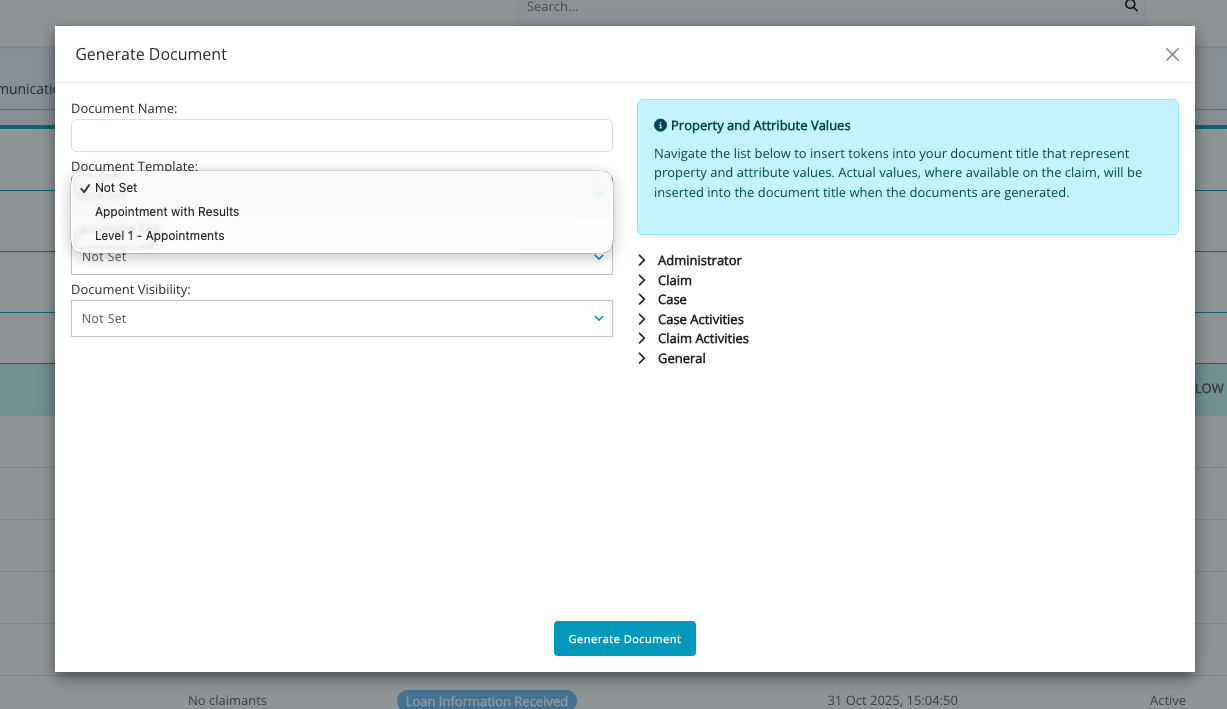
- Complete the form, selecting the template you wish to use.
- Click 'Generate Document'
- YYour documents will be generated as a background job and appear on the relevant claims when complete. If you wish to check on the progress of your document generation, you may view this in the Automations Overview page.